Wednesday, July 30, 2008

How to override graphics on screen


T
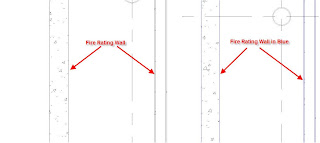
here are many a times that we need to show the graphics differently for same object in different situation. For eg. the wall outline are normally plot in black, but let's say for fire safety department, you need to show all the wall with fire ratings in certain color (as above).

To do this, you may use Filter which is a very useful tool to override graphics consistently for diffrent situations.

1. Setup Filter - pick Filters from Setting pull down menu.
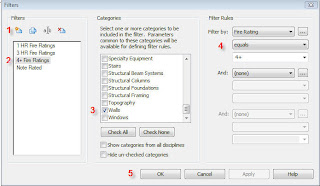


1. Create a New Filter.

2. Give a Filter Name.
3. Choose from appropriate category. In this case, it is Wall.
4. Specify the Filter Rules.
5. Click OK.

2. Specify the properties for your object. In this case, it is Wall.
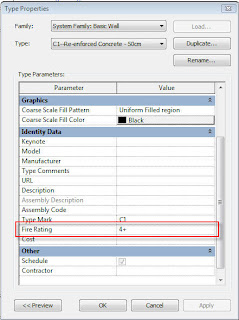
Notice that I have specified the Fire Rating.


3. Select the object to apply the filter for graphics override and right click.
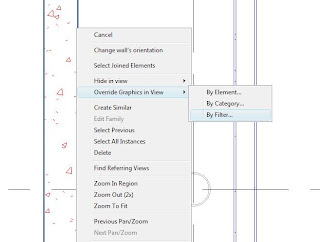
Choose Override Graphics in View - By Filter


4. When the Visibility/Graphics Override dialog appear, specify the line color accordingly.


5. There you have it.

Sunday, July 27, 2008

Problem with 3D View in Revit 2009


In Revit Architecture 2009, you may find a problem with 3D view (non perspective view). It would appear as half shaded and half wire frame (as attached).

This is because of a bug within the display of Revit Archietcture 2009. This also happens with AutoCAD 2009 as well. However, there is any easy way to solve this problem. Just delete the 3D View and goto View menu and choose New then Default 3D View. Voila! The 3D view appear as normal now.

Wednesday, July 23, 2008

Revit Fill Patterns

Revit Fill Pattern is more powerful then what a lot of people think. Sometimes you may tried to arranged the tile pattern on that wall or floor so that they will not appear as half tile or quarter tile. For those who have used AutoCAD hatch pattern will realise that it is impossible to do so in AutoCAD. They end up drawing the exploding the pattern and tried to rearranged the tile pattern manually.

Now in Revit, you just have to put a surface pattern on the wall or floor. Then use ALIGN command to align the tile. You will see the tile pattern aligned to the edge selected. COOL.....

There are also not many Revit Fill Pattern inside Revit. What you may do is to import AutoCAD acad.pat or similar file. However, any pattern from AutoCAD can only be brought in as a Drafting Pattern. To convert them to Model Pattern simply add ;%TYPE=MODEL to the line between the name and the text for the pattern itself for it to be used as a Model Pattern in Revit.

Eg;

*Block 8x16, 8 x 16 Blocks Runing Bond
;%TYPE=MODEL
0, 0, 0, 0,
90, 0, 0, 8

If you open up the revit.pat file (located at C:\Program Files\Revit Architecture 2008\Data) there is a pretty decent description on what needs to be added for the pattern types.

Tuesday, July 22, 2008

CADclip - REVIT MEP 2008 - HVAC DEMO

Thanks to CADclip for contributing this Clip for HVAC Demo