Friday, December 4, 2009

Green Building Index

Green building is the rage now a days. There are some people who had asked me regarding this. This is how Malaysia Architects Association (PAM) rate the green building. The following is an extract from GreenBuildingIndex.org.

THE GBI RATING SYSTEM

BUILDINGS WILL BE AWARDED THE GBI RATING BASED ON 6 KEY CRITERIA:

1 Energy Efficiency (EE)
2 Indoor Environmental Quality (EQ)
3 Sustainable Site Planning & Management (SM)
4 Material and Resources (MR)
5 Water Efficiency (WE)
6 Innovation (IN)

1) Energy Efficiency (EE)
Improve energy consumption by optimising building orientation, minimizing solar heat gain through the building envelope, harvesting natural lighting, adopting the best practices in building services including use of renewable energy, and ensuring proper testing, commissioning and regular maintenance.

2) Indoor Environment Quality (EQ)
Achieve good quality performance in indoor air quality, acoustics, visual and thermal comfort. These will involve the use of low volatile organic compound materials, application of quality air filtration, proper control of air temperature, movement and humidity.

3) Sustainable Site Planning & Management (SM)
Selecting appropriate sites with planned access to public transportation, community services, open spaces and landscaping. Avoiding and conserving environmentally sensitive areas through the redevelopment of existing sites and brownfields. Implementing proper construction management, storm water management and reducing the strain on existing infrastructure capacity.

4) Materials & Resources (MR)
Promote the use of environment-friendly materials sourced from sustainable sources and recycling. Implement proper construction waste management with storage, collection and re-use of recyclables and construction formwork and waste.

5) Water Efficiency (WE)
Rainwater harvesting, water recycling and water-saving fittings.

6) Innovation (IN)
Innovative design and initiatives that meet the objectives of the GBI.

Achieving points in these targeted areas will mean that the building will likely be more environment-friendly than those that do not address the issues. Under the GBI assessment framework, points will also be awarded for achieving and incorporating environment-friendly features which are above current industry practice.

THE GBI RATING TOOLS

NON-RESIDENTIAL

The GBI Non-Residential Rating tool evaluates the sustainable aspects of buildings that are commercial, institutional and industrial in nature. This includes factories, offices, hospitals, universities, colleges, hotels and shopping complexes.

Of the six criteria that make up the GBI rating, emphasis is placed on energy efficiency and indoor environmental quality as these have the greatest impact in the areas of energy use and well-being of the occupants and users of the building.

By improving on the efficiency of active (mechanical and electrical) systems as well as incorporating good passive designs together with proper sustainable maintenance regimes, significant reductions in consumed energy can be realised. This can lead to a reduced carbon footprint and also offers long-term savings for the building owners.

Points NR


RESIDENTIAL

The GBI Residential Rating tool evaluates the sustainable aspects of residential buildings. This includes linked houses, apartments, condominiums, townhouses, semi-detached and bungalows.

This tool places more emphasis on sustainable site planning & management, followed by energy efficiency. This serves to encourage developers and home owners to consider the environmental quality of homes and their inhabitants through better site selection, provisions of public transport access, increased community services and connectivity, as well as improved infrastructure.

Such achievement will help reduce the negative impact to the environment and create a better and safer place for residents and the community as a whole.

Points R
DOWNLOAD THE GBI RESIDENTIAL TOOL

GBI CLASSIFICATION
POINTS GBI RATING
86+ points Platinum
76 to 85 points Gold
66 to 75 points Silver
50 to 65 points Certified

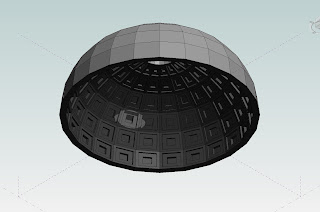
The Dome of Panthoen

I come across this exciting piece by Zach Kron of Buildz. Looking at the things taking shapes accompanying it with a piece of classical of Gioachino.Rossini - William Tell Overture (Finale) by maestro Herbert von Karajan is indeed very enjoyable. Only thing is that the piece is too short for the Revit to finish processing the journal. I would suggest follow it up with another piece - the Gioachino Rossini - The Barber of Seville - Overture. It would make your day!

The following is exactly as Zach put it.


Psst, hey kid . . . want to make the dome of the Pantheon in 220 seconds* with Revit 2010?

1.
Extract the contents of this .zip file to a folder on your machine.
2. Identify the file pimpMyDome.txt
3. Put on your headphones.
4. Drag and drop pimpMyDome.txt into your Revit 2010 desktop shortcut.
5. While Revit is starting up, click on this link: http://www.youtube.com/watch?v=JkymTHSbWe0

When it's all over, inspect the folder were pimpMyDome.txt was, you get a PRIZE! A freshly baked parametric coffer panel!

Revit vs Sketchup

This is a video that is from YouTube illustrated very clearly what can Sketchup and Revit achieve with the same amount of time. Next time I will have discussion on this.

Saturday, November 28, 2009

Overriding dimension text in Revit

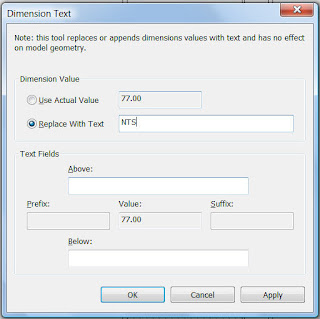
One advantage about AutoCAD dimension is that we can put in a cheat value or sometimes we just put "NTS" for Not To Scale measurement. So how do Revit handles this then?

From Revit 2009 onwards, you can actually do that though not exactly the same. Revit 2009 allows to manually overwrite the automatic dimension value with another, descriptive text.

When you double-click on the dimension text, the "Dimension text" dialog is displayed. There you can enter the overrides - the text, prefix, postfix, etc.:


Revit will warn you if you try to overwrite the measured value with numeric value - only texts are allowed.

If you really want to enter a "fake" value, you may enclose it with parentheses or prefix it with dashes.

Open Revit files directly from web

Are you aware that you can actually open Revit projects (RVT) and families (RFA) direcly from web?

It is true. Revit can open RVT and RFA files (projects, families) directly from a URL address on web.

In the file open dialog (Ctrl+O) try e.g. to enter the file name as:

http://www.revitlibrary.com/dl/project-abc.rvt

Revit will download the file from the internet to a temporary folder and open it for editing. Possible changes are saved back to this temporary file (not back to the web).

Another option for using web repositories is inserting Revit families (libraries) directly from web by mouse-dragging with the iDrop technology. Try e.g. to use the "eyedropper" and drag the table from the web page (say Revitcity) to your Revit application window.

Cannot display thumbnails of RVT/RFA files in Windows Explorer

The other day, I was installing Revit Architecture 2010 at my customer place. I realized that the Windows Explorer in Windows Vista just does not display the proper thumbnails (preview) of Revit projects (.RVT) and Revit families (.RFA). Re-installation also does not seems to help either.

After some googling, I found the solution as follows:

Run the command window in the Administrator mode (under Windows Start type "cmd", right-click on the result and choose "Run as Administrator"). In the command line then type:

regsvr32 "C:\Program Files\Autodesk Revit Architecture 2010\Program\RevitPreview.dll"

This will re-register the DLL library for previews - RevitPreview.dll. A message confirming a successfull registration of the DLL module should appear. After this, the thumbnails (preview) will appear properly.

Friday, November 27, 2009

Top 10 Reasons to upgrade to Autodesk Revit Architecture 2010?

Actually, this should be called the top 10 features of Revit Architecture 2010 as it is taken right off the Autodesk Revit Architecture Top 10 Features. However, just to answer some of my customers who ask me the reason for them to upgrade to Revit Architecture 2010. So here goes. (Excuse me for the language used. I know they are a bit nauseating...)

1 Conceptual Design Environment


New and innovative Autodesk Revit Architecture conceptual design features provide easy-to-use tools for free-form modeling and parametric design, and the ability to perform early design analyses. Sketch freely, create 3D forms quickly, and manipulate forms interactively. Prepare your models for fabrication and construction with built-in tools for conception and clarifi cation of complex forms. Autodesk Revit Architecture automatically builds a parametric framework around your most complex forms as you continue to design, offering you greater levels of creative control, accuracy, and flexibility. Take your design from concept model all the way through construction documents, all within one intuitive environment.

2 Building Maker


The Building Maker feature helps you transform your conceptual forms into fully functional designs. Select and add faces to design walls, roofs, floors, and curtain systems. Extract important building information, including gross area per floor. Bring conceptual massing concepts from applications such as AutoCAD software and Autodesk Maya software, as well as AutoDes-Sys form-Z, McNeel Rhinoceros, Google Sketch-Up, or other ACIS- or NURBS-based applications into Autodesk Revit Architecture as mass objects and begin schematic design.

3 Bidirectional Associativity


A change anywhere is a change everywhere. In Autodesk Revit Architecture, model information is stored in a single, coordinated database. Revisions and alterations to information are automatically updated throughout the model, minimizing conflicting versions and significantly reducing unpleasant surprises.

4 Parametric Components


Parametric components, also known as families, are the basis for all building components designed in Autodesk Revit Architecture. These components offer an open, graphical system for design thinking and form making, while providing the opportunity to adjust and express design intent at detailed levels. Use parametric components for the most elaborate assemblies, such as cabinetry and equipment, as well as for the most elementary building parts, such as walls and columns. Best of all, no programming language or coding is necessary or required.

5 Schedules


Schedules provide another view of the comprehensive Autodesk Revit Architecture model. Changes to a schedule view are automatically reflected in all other views. Functionality includes associative split schedule sections and selectable design elements via schedule views, formulas, and filtering.


6 Detailing


The extensive detail library and detailing tools provided within Autodesk Revit Architecture enable extensive presorting, easing alignment with the CSI format. Detail libraries can be created, shared, and tailored to accommodate your office standards.


7 Material Takeoff


Calculate detailed material quantities with the Material Takeoff feature. Ideal for use on sustainable design projects and for precise verification of material quantities in cost estimates, this feature significantly smoothed the material quantity tracking process. As projects evolve, the Autodesk Revit Architecture parametric change engine helps ensure material takeoffs are always up to date.

8 Intuitive User Interface


The Autodesk Revit Architecture 2010 features a streamlined user interface. Find your favorite tools and commands faster, locate lesser-used tools more efficiently, and discover relevant new features more easily. The result is less time searching through menus and toolbars, and more time getting your work done.


9 Sustainable Design


Autodesk Revit Architecture supports sustainable design processes from the earliest stages. Export building information to green building extensible markup language (gbXML). Perform energy analysis using Autodesk Green Building Studio web based services, and study building performance employing Autodesk Ecotect software. Use Autodesk 3ds Max Design software to accurately evaluate indoor environmental quality in support of LEED 8.1 certification.

10 Design Visualization


Create and capture fully photorealistic design ideas and contextual environments to experience your project, even before it is built. Integrated mental ray rendering helps deliver high-quality output, faster render times, and a superior design presentation.

Sunday, June 14, 2009

Where is my command Revit 2010 Flash Movie

Thanks to Nicholas Iyadurai of Revitize on the following Flash Movie for Where is my command in Revit 2010. It is basically an interactive tool that allows user to pick the command in Revit 2009 and the corresponding loation of the command in Revit 2010 will be shown. This is indeed a very helpful tool for people who are transitioning from the long time UI to the new Ribbon UI.

You may click here to download the tool. Or you may click here to use it online.

Friday, June 12, 2009

Rendering Tips in Revit 2009/2010

One question that I encounter recently goes like this. We understand that Mental Ray rendering in 3ds Max would be rendering in random box (called bucket), this bucket actually indicate that how many processors are being used in the rendering. So, for a Dual Core processor, there would be two buckets running on screen. In the same way, Quad Core processor would display 4 buckets when rendering. Now, Revit rendering also employs Mental Ray technology, why you cannot utilise all the 4 cores in the rendering?

The answer is this:
Revit rendering do not exactly employ the same technology even though it is said to be Mental Ray based. So, the Revit rendering does utilise all the 4 cores but it only shows 1 bucket while rendering.

Monday, June 8, 2009

Introduction to Conceptual Massing in Revit 2010

Conceptual Massing in Revit 2010 is the major feature and major addition in Revit 2010. It allows Revit to create more complex form which is formerly available only in software such as 3DS Max. Even though the function to create complex shape is not as comprehensive as in 3DS Max but it does expand the architectural forming ability.

For conceptual massing, the user have to choose Metric Mass from the available family template. In fact there is only one choice.

1. Once conceptual massing is initiated, you will see 3 reference planes. 2 are vertical planes and 1 horizontal plane. To set the horizontal plane as the current work plane, one has to first pick and highlighted the horizontal plane to set it to be the current work plane.

2. After set the work plane, you may draw the curve just as in diagram. This shape is achieved by mirroring a 3 point arc.


3. Pick on the shape and highlighted it. Pick on Create Form >Form to extrude it into solid shape.


4. Pick the blue arrow to drag to appropriate height.


5. Highlight the top face and rotate it. As you rotate the top face you will also twist the cylinder.


6. Highlight the element face and pick Xray to display the form in Xray form.


7. With the face still highlighted, pick Add Profile.


8. You may change the added profile by dragging the orange arrow. You will see the form is now becoming more interesting.


9. You may further change the form by highlighting the axis point and drag.


10. The elevation of the resulting form

.


Saturday, June 6, 2009

Revit 2010 Interface Mapping (Cont'd)

View Bar

View Tab

Floor Plan, Ceiling Plan & Plan Region

Create Panel>Plan Views Drop Down

Section

Create Panel>Section

Elevation

Create Panel>Elevation Drop Down>Elevation

Callout

Create Panel>Callout

Drafting View

Create Panel>Drafting View

Camera & Walkthrough

Create Panel>3D View Drop Down

Legend

Create Panel>Legends Drop Down>Legend

Schedule/Quantities

Create Panel>Schedules Drop Down> Schedule/Quantities

Sheet

Sheet Composition Panel>New Sheet

Add View

Sheet Composition Panel>View


Modeling Bar

Home Tab

Wall, Door, Window

Build Panel

Column

Build Panel>Column Drop Down>Architectural Column

Component

Build Panel->Component Drop Down>Place a Component

Roof>Roof by Footprint; Roof by Extrusion; Roof by Face; Roof Soffit

Build Panel>Roof Drop Down

Floor

Build Panel>Floor Drop Down>Floor

Ceiling

Build Panel>Ceiling

Stairs, Railing & Ramp

Circulation Panel

Model Text

Model Panel>Model Text

Curtain System, Curtain Grid & Mullion

Build Panel

Host Sweep>Wall Sweep, Wall Reveal

Build Panel> Wall Drop Down

Host Sweep>Roof Fascia, Roof Gutter

Build Panel> Roof Drop Down

Host Sweep>Floor Slab Edge

Build Panel> Floor Drop Down>Floor Slab Edge

Opening

Modify Tab>Edit Geometry Panel>Openings

Decal

Insert Tab>Link Panel>Decal Drop Down>Place Decal

Lines

Model Panel>Model Line

Model Group

Model Panel>Model Group Drp Down>Place Model Group

Create

Build Panel>Component Drop Down>Model-In-Place


Drafting Bar

Annotate Tab

Dimensions, Spot Dimensions

Dimension Panel

Text

Text Panel>Text

Grid, Level

Home Tab> Datum Panel

Matchline

View Tab>Sheet Composition Panel>Matchline

Ref Plane

Home Tab> Work Plane Panel>Ref Plane Drop Down>Draw Reference Plane

Scope Box

View Tab>Create Panel>Scope Box

Keynote, Tag, Tag All Not tagged

Tag Panel

Room Tag

Home Tab>Room & Area Panel>Tag Drop Down>Tag Room

View Reference

Tag Panel>View Reference

Symbol

Detail Panel>Symbol

Legend Component

Detail Panel>Component Drop Down>Legend Component

Color Scheme

Home Tab>Room & Area Panel>Legend (named differently now)

Detail Lines

Detail Panel>Detail Line

Detail Group

Detail Panel>Detail Group Drp Down>Place Detail Group

Detail Component, Repeating Detail

Detail Panel>Component Drop Down

Masking Region, Filled Region

Detail Panel>Region Drop Down

Insulation, Revision Cloud

Detail Panel


Rendering Bar


Rendering Dialog

View Control Bar. It is only shown in 3D view.


Massing Bar

Massing & Site Tab

Create Mass

Conceptual Mass Panel>In-Place Mass

Place Mass

Conceptual Mass Panel>Place Mass

Wall by Face, Floor by Face, Curtain System by Face, Roof by Face

Conceptual Mass Panel>Model by Face Drop Downl

Section

View Tab>Create Panel>Section

Level

Home Tab> Datum Panel>Level


Room and Area Bar

Home Tab

Settings

Room & Area Panel>Room & Area Panel Drop Down>Area and Volume Computation

Room

Room & Area Panel>Room Drop Down>Room

Room Tag, Area Tag

Room & Area Panel>Tag Drop Down

Room Separation

Room & Area Panel>Room Drop Down>Room Separation Line

Area Plan, Area, Area Boundary

Room & Area Panel>Area Drop Down

Color Scheme

Room & Area Panel>Legend


Structural Bar

Home Tab

Ref Plane

Work Plane Panel>Ref Plane Drop Down>Draw Reference Plane

Line

Model Panel>Model Line

Framing Elevation

View Tab>Create Panel>Elevation Drop Down>Framing Elevation

Structural Column

Build Panel>Column Drop Down>Structural Column

Structural Wall

Build Panel>Wall Drop Down>Structural Wall

Beam, Beam System

Structure Panel>Beam Drop Down

Brace

Structure Panel>Brace

Component

Build Panel->Component Drop Down>Place a Component

Roof

Build Panel>Roof Drop Down

Slab

Build Panel>Floor Drop Down>Structural Floor

Foundation

Structure Panel>Foundation Drop Down


Construction Bar


Site Component

Massing & Site Tab>Model Site Panel>Site Component

Phases

Manage Tab>Manage Project Panel>Phases

Schedule/Quantities

View Tab>Create Panel>Schedule Drop Down


Settings Menu

Manage Tab

Project Information, Project Parameter

Project Settings Panel

Manage Place and Locations

Project Location Panel>Location

Browser Organization

View Tab> Windows Panel>User Interface Drop Down>Browser Organization

Fill Pattern, Render Appearance Library, Object Styles, Revisions, LineWeight, Line Styles, Line Patterns, Sun and Shadow Settings, View tags, Snaps, Temporary Dimension, Detail Level

Project Settings Panel>Settings Dop Down

Decal Type

Insert Tab> Link Panel>Decal Drop Down>Decal Types

Phases

Manage Tab>Manage Project Panel>Phases

Area and Volume Computation

Home Tab>Room & Area Panel>Room and Area Panel Drop Down>Area and Volume Computation

View Templates

View Tab>Graphics Panel>View Templates Drop Down>View Template Setting

Color Fill Schemes

Home Tab>Room & Area Panel>Room & Area Panel Drop Down>Color Schemes

Keynoting

Annotate Tab>Tag Panel>tag Drop Down>Keynote Settings

Filters

View Tab>Graphics Panel>Filters

Site Settings

Massing & Site Tab>Model Site Panel>Model Site Panel Arrow

Structural Settings

Home Tab>Structure panel>Structure Panel Arrow

Annotations>Arrowhead

Project Settings Panel>Settings Drop Down

Annotations>Dimensions

Annotate tab>Dimensions Panel>Dimensions Drop Down

Annotations>Loaded Tags

Annotate tab>Tags Panel>Tags Drop Down

Annotations>Text

Annotate tab>Text Panel>Text Panel Arrow

Project Units

Project Settings Panel

Options

Applications Menu>Options (next to Exit Revit)